Saturday, August 21, 2010
consolodation
From here on in, please go to my manitoba supermono site for updates -- 3 separate blogs is a bit silly... see y'all there!
Monday, August 16, 2010
Still waiting...
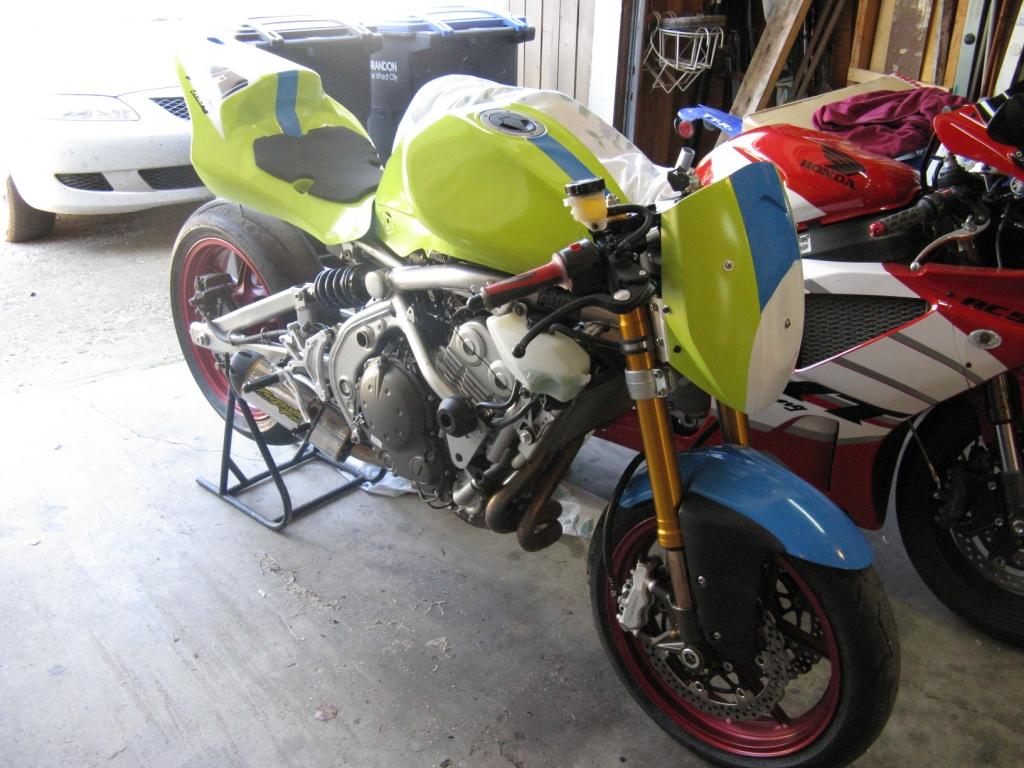
On the upgraded brakes -- new pads and lines are in transit. My zx6R ignition switch came in today -- I had to fiddle with some wiring to get it to work but it does. Its required for the quick turn throttle kit, as that item does not come with any switches. Painting the new front upper, whose fitment is far simpler than the first version. Will likely clearcoat it and the bellypan on Wednesday if the weather cooperates. Tires are in at Pop's so those can be mounted at the end of the month when they come for a visit. Hopefully I've got the error codes sorted out -- still need to figure a way to do some top speed testing prior to going to Gimli, but not at Souris due to the huge amounts of gravel on that runway... will hole my radiator for sure!
Wednesday, August 11, 2010
makin' it legal
I've gotten a taste of racing in the 'states (or elsewhere, for that matter), and to do so, depending on the sanctioning body, requires certain provisions. An oil retaining bellypan is mandated, even at Gimli, even though it is not enforced by tech. Regardless, I now know firsthand the delays caused by blown engines, or more commonly, failed oil filters. Short of a full fairing, the only oil-retaining bellypan available is in the UK. And so, with my trusty VISA card, I made a call to the mother country. After a short delay, this arrived via fedex:
 As usual, I've got a coat of primer and one coat of Key Lime applied already. Should hold far more than the 2L of oil that the ex crankcase holds.
 That is real carbon fibre -- impressively light, and thick. In a crash, it will grind away first before we get into the oil-retaining parts of the engine. I've simply glued it via epoxy.
 The power commander has also arrived. It, a ride on Doug's bike, the FI light trouble, and the shape of the oil retaining bellypan has necessitated what I hope to be the final "major" expense of the project -- a Muzzy full system. Doug has had one on his bike for years. There is a dedicated map for it available from Dynojet (which will save time on the dyno coming up with a map for my home-made system) and will also fit with the bellypan (which my current mockup will not). It too is backordered (no one is stocking anything in this economy), but I did get a good deal on it from an online warehouse... under $400 for a complete system -- not a bad price! This is what it looks like:
 Note the reverse megaphone shape. There is a removable baffle inside, and the header pipes are larger for less restriction. Again, far lighter than stock as well, and Doug's machine is quicker than his son's bike, which has just a LeoVince slip on.
 As usual, I've got a coat of primer and one coat of Key Lime applied already. Should hold far more than the 2L of oil that the ex crankcase holds.
While I was at it, I also ordered the only thing that passes for case covers for the ex. Granted, some diligent ebaying would have found me spare alternator and clutch covers for a similar price, but with no extra protection. NRG used to be the go-to company for these things, but I'm not sure they are in business. Last part I bought from them was a set of covers for my zx6R racer back in 2002 -- so these came with the bellypan; one for the clutch side (pictured) and another for the alternator.
 That is real carbon fibre -- impressively light, and thick. In a crash, it will grind away first before we get into the oil-retaining parts of the engine. I've simply glued it via epoxy.
 The power commander has also arrived. It, a ride on Doug's bike, the FI light trouble, and the shape of the oil retaining bellypan has necessitated what I hope to be the final "major" expense of the project -- a Muzzy full system. Doug has had one on his bike for years. There is a dedicated map for it available from Dynojet (which will save time on the dyno coming up with a map for my home-made system) and will also fit with the bellypan (which my current mockup will not). It too is backordered (no one is stocking anything in this economy), but I did get a good deal on it from an online warehouse... under $400 for a complete system -- not a bad price! This is what it looks like:
 Note the reverse megaphone shape. There is a removable baffle inside, and the header pipes are larger for less restriction. Again, far lighter than stock as well, and Doug's machine is quicker than his son's bike, which has just a LeoVince slip on.
So, no excuses then... proper tires, full system, correct map... it's down to me now... as rusty as I am!
Tuesday, August 10, 2010
1st try
Had the ex out at the track this past weekend -- just wanted a quick 20 min session to see where it was at to date. In hindsight, it wasn't that the bike was dangerous, but for real racetrack riding, I had rushed it a bit. I learned that:
1. The 2CT tires were not suited to the bike. They have a super low profile and not much edge to them -- very round, and are dimensionally so different from what I was used to, the didn't even properly fit in the trailer "saddles" -- too small by nearly an inch. Made for an unsettling ride through the corners, and a "moment". Need to find better tires!
2. I pushed the brake issue -- OLD as in "wafer thin" pads left, and rubber hoses -- after 5-6 laps, the lever was coming back to the bar, and I'm not a late braker! Still waiting after 3 weeks for replacement pads! Stainless lines are also on order.
3. I hadn't run the bike much at all prior to getting to the track. Took it out Friday night for a rip along an access road at the track, and the FI light came on. Bike really didn't run a whole lot poorer, but wouldn't rev out till redline, or much past 9000 rpm. Could be a number of things -- the removed subthrottles, the map I downloaded, or some other fault. Doug has the proper Kawi diagnostic tool, so perhaps he can shed some light. I didn't like the on/off throttle response anyway, so the subthrottles have gone back on to the machine. Its doubtful, but that also might be the source of the error code.
In all, a good indication of where the bike was at, but I did push the issue a bit. Should be much better for September.
Monday saw another part arrive, a supermoto-style water overflow catch can. Going "nekkid" with the bike leaves a plastic overflow tank exposed sans fairing. If the bike were to go down on that side, it would no doubt be damaged or destroyed and I'd have to park it. This item, while marginally heavier is also more durable. I've also tucked it in a bit profile wise, as well as move it to the other side of the bike, and lower.
 As all mods do, it required some fabrication on my part, but it seems to work OK where it is. More updates to come.
1. The 2CT tires were not suited to the bike. They have a super low profile and not much edge to them -- very round, and are dimensionally so different from what I was used to, the didn't even properly fit in the trailer "saddles" -- too small by nearly an inch. Made for an unsettling ride through the corners, and a "moment". Need to find better tires!
2. I pushed the brake issue -- OLD as in "wafer thin" pads left, and rubber hoses -- after 5-6 laps, the lever was coming back to the bar, and I'm not a late braker! Still waiting after 3 weeks for replacement pads! Stainless lines are also on order.
3. I hadn't run the bike much at all prior to getting to the track. Took it out Friday night for a rip along an access road at the track, and the FI light came on. Bike really didn't run a whole lot poorer, but wouldn't rev out till redline, or much past 9000 rpm. Could be a number of things -- the removed subthrottles, the map I downloaded, or some other fault. Doug has the proper Kawi diagnostic tool, so perhaps he can shed some light. I didn't like the on/off throttle response anyway, so the subthrottles have gone back on to the machine. Its doubtful, but that also might be the source of the error code.
In all, a good indication of where the bike was at, but I did push the issue a bit. Should be much better for September.
Monday saw another part arrive, a supermoto-style water overflow catch can. Going "nekkid" with the bike leaves a plastic overflow tank exposed sans fairing. If the bike were to go down on that side, it would no doubt be damaged or destroyed and I'd have to park it. This item, while marginally heavier is also more durable. I've also tucked it in a bit profile wise, as well as move it to the other side of the bike, and lower.

Sunday, August 1, 2010
steering damper, tires, and swingarm
Made use of the many brackets that come with a stock streetbike...
 Left over steering damper from another project... bolted to one of the frame brackets -- fork mount was yet another steel 90 degree bracket that I fabricated to mount to the fork clamp.
 Pilot power tires "borrowed" from the supermono. Hope to take this bike out to the track this upcoming weekend -- needed something better than 4-year old Pirellis.
 Analogue lap timer mounted. I may be getting a bit ahead of myself, but curiosity might get the best of me...
 Winter project -- Versys swingarm. Yes, I will update the cost breakdown soon... sigh...
Tuesday, July 27, 2010
together and running
Here it is, in almost-ready condition...
 Still need to come up with a proper water/rad catch can -- this one overflows into...? The ground. Have a supermoto-style race catch can on the way.

 I was able to use the stock gauges, mounted via aluminum brackets to the front fairing mask. Very light and puts minimal stress on the fairing. Miscalculated on the fairing a bit -- is eventually going to sit up higher, right now one of the brackets fouls on the front brakeline...
 Chin fairing needed for full-on race certification. I have an OEM one that I am currently modifying to make capable to retain oil. Will take awhile -- besides the proper bellypan brackets are on backorder... Even took it for a quick spin around the block. Seems to run OK, with some jetting work needed...

 Still need to come up with a proper water/rad catch can -- this one overflows into...? The ground. Have a supermoto-style race catch can on the way.
 I was able to use the stock gauges, mounted via aluminum brackets to the front fairing mask. Very light and puts minimal stress on the fairing. Miscalculated on the fairing a bit -- is eventually going to sit up higher, right now one of the brackets fouls on the front brakeline...
 Chin fairing needed for full-on race certification. I have an OEM one that I am currently modifying to make capable to retain oil. Will take awhile -- besides the proper bellypan brackets are on backorder... Even took it for a quick spin around the block. Seems to run OK, with some jetting work needed...
Monday, July 26, 2010
On yer feet!
Finally, the bearings, fork seals, and minutae of other parts were at the same place at the same time for once, and the bike is now on its "feet"...
 Ok -- to make it "official". Stock front wheel, bored hub to accept 636 front bearings, seals, and internal spacer; front 636 axle; 636 2003-04 triple clamps; 05-06 forks (also from a 636). This setup allows the use of the stock front rotors as well (320mm), which again saves a bit of dosh. Clip ons are from woodcraft.
 Front radial master cylinder -- from a zx10, I think. Brake lines are the stock rubber jobbies, and will have to do for now. Still trying to fully bleed the system. In need of some new brake pads!
 At the back, the Penske rear shock -- a great buy on ebay -- essentially half price, and complete -- all the spacers and mounting doohickies were included. Remote resevior is located on the other side of the bike.
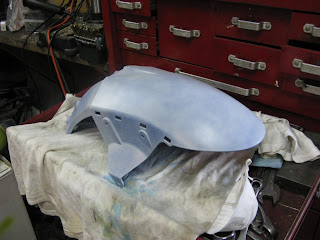
 Detail shot -- adjustable preload (of course), with compression and rebound as well. Need to set up the sag and go from there. Front bellypan has arrived from the UK -- needs proper ER6N mounts (on backorder, of course) which won't arrive until the middle of August. Currently am modifying the bellypan to retain oil, and not just be an asthetic exercize. Note in this pic that the brake reseviour for the rear has been removed -- I actually needed a lenght of hose for the front!
 Ok -- to make it "official". Stock front wheel, bored hub to accept 636 front bearings, seals, and internal spacer; front 636 axle; 636 2003-04 triple clamps; 05-06 forks (also from a 636). This setup allows the use of the stock front rotors as well (320mm), which again saves a bit of dosh. Clip ons are from woodcraft.
 At the back, the Penske rear shock -- a great buy on ebay -- essentially half price, and complete -- all the spacers and mounting doohickies were included. Remote resevior is located on the other side of the bike.
 Detail shot -- adjustable preload (of course), with compression and rebound as well. Need to set up the sag and go from there. Front bellypan has arrived from the UK -- needs proper ER6N mounts (on backorder, of course) which won't arrive until the middle of August. Currently am modifying the bellypan to retain oil, and not just be an asthetic exercize. Note in this pic that the brake reseviour for the rear has been removed -- I actually needed a lenght of hose for the front!
 Bodywork remaining (tank, front fender, and KTM mask) is currently curing after a coat of clear. Actually have a Superduke (KTM) front fairing coming in as well, as it is a bit larger and will provide more of a windbreak for me 'ead.
Saturday, July 24, 2010
Tanks for the memories
More painting work as the hard parts make their way to me. The fuel tank was once a nice metallic black, now in "team colors"...
 Again, not bad for a backyard paint job. Next is to let it fully cure, lightly go over it with a scuff pad, and then hit it with the clearcoat.
 Dad wearing it as a hat... apparently this is how he smuggled it over the border... (don't tell the queen!)...
 And how it looks now, with a light coat of primer on it. Note that when you are crammed for space, anything and everything can become a table to have painted parts dry. A number of smaller ones hang from the rafters on coathangers, making the garage look like some sort of psychedelic abbatoir...
 Crash bungs came in -- proper stuff, the "official" Kawasaki parts. Normally costing $180, I got them for $50, still in the original package. They were originally intended to work with stock, fully faired bodywork -- as such, they had nice aluminum spacers that set the pucks 5-6" out from where there are here -- looked silly. So I removed the spacers and bolted the pucks directly to the mounts -- main role is to protect the radiators, which these will. However, as you can see, the side skirts no longer fit... damn, damn, dammit! Will have to think on this for awhile -- perhaps I can move the pucks lower on the mounts?
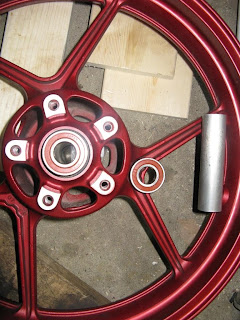 It took a second trip, but the wheel has been machined to suit the larger 600 bearnings for the 25mm axle. The new bearings, seals, and spacers are already installed, and the original bearing is sitting on top of the spacer -- you can see the amount of material that needed to be removed.
 Perhaps this pic is clearer -- maybe, a bit of aluminum anyway. That being said, if this works (and it should), I prefer this route to buying a new 600 wheel. The bearings, spacer, seals, and maching did set me back $150 -- but it's hard to find a straight front 600 wheel for that price, and plus I'd need to get it shipped to me as well. Futher, this wheel matches the rear, and it is surprisingly light for the price of the bike. Soon as I get the forks back together, I'll fit everything up. Cross your fingers!
 Again, not bad for a backyard paint job. Next is to let it fully cure, lightly go over it with a scuff pad, and then hit it with the clearcoat.
Fender will be done at the same time...
 Dad wearing it as a hat... apparently this is how he smuggled it over the border... (don't tell the queen!)...
 And how it looks now, with a light coat of primer on it. Note that when you are crammed for space, anything and everything can become a table to have painted parts dry. A number of smaller ones hang from the rafters on coathangers, making the garage look like some sort of psychedelic abbatoir...
 Crash bungs came in -- proper stuff, the "official" Kawasaki parts. Normally costing $180, I got them for $50, still in the original package. They were originally intended to work with stock, fully faired bodywork -- as such, they had nice aluminum spacers that set the pucks 5-6" out from where there are here -- looked silly. So I removed the spacers and bolted the pucks directly to the mounts -- main role is to protect the radiators, which these will. However, as you can see, the side skirts no longer fit... damn, damn, dammit! Will have to think on this for awhile -- perhaps I can move the pucks lower on the mounts?
 It took a second trip, but the wheel has been machined to suit the larger 600 bearnings for the 25mm axle. The new bearings, seals, and spacers are already installed, and the original bearing is sitting on top of the spacer -- you can see the amount of material that needed to be removed.
Wednesday, July 21, 2010
Parts and painting

 I also realized that the forks I got, while straight, had a badly leaking seal... which means new seals (on order) and a decision to purchase a proper fork oil seal driver. Both the 'mono and this bike use 41mm forks (the inner tube) so likely a decent investment, considering I can now do the work myself. As well, this is a pretty common size, so good to have in the toolkit if I am doing work for other riders.
 Rather than copy the Gulf Oil paint scheme (couldn't find the proper shade of Orange anyway) I've decided to maintain "team colours" and go with the Key Lime/Medium Blue theme from the 'mono... besides the paint is available from Canadian Tire for under 6 bucks a can, and reacts well with the Clearcoat I use.
 Particularly proud of the tail section -- this is the former R1 piece Dad and I worked to fit on the shortened subframe. Still need to cut and apply some seat foam, and put on the numbers (see below), but I think it looks pretty damn good. Tank will follow suit.
 Front 3/4 view. Still a ways to go yet. At least the wheelbearings have come in, and the front wheel is at Atom Jet for machining. Hopefully the bike will be on it's feet by next week. Not sure if I'll make the August round, but Sept. for sure.
 Just in case anyone didn't know who was riding the lime green, loud, naked bike... The final (hopefully) major purchase will be a power commander. It transformed the RC51, just with a posted map and not a proper tune, so I know the potential of these things. Considering the homebrew exhaust and some other tweaks, a proper tune will be in order. I may have found a dyno guy in Winnipeg, and plan to get the bike properly mapped in the fall.
Saturday, July 17, 2010
Subframe Modification
Saw a souped up ex650r at mid-america. Short of a $1200 arata exhaust system, some of the mods on that bike were more pedestrian -- specifically, a shortened rear subframe and a different tail section. EX650R tails go for around $200 'murican, for the bolt on and forget it option. You'll notice I bought an R1 tail for around $50 USD. The task, once in my hands, was getting it to fit. Luckily mom and pop were visiting -- and while mom and Kate were doing things like whipping up 3-course meals, Dad and I were in the garage, bending some aluminum and cutting some steel.
 I also had to reposition the ECU, and find a spot for a ground strap. Luckily everything just tucked in a bit closer to the center of the bike. The thin alloy acts as an undertail, protects the ECU, and also has a hole for a pickup point for the rear of the tail (currently being painted by meself). The one strap holds the ECU in its stock rubber bracket, and the rearward one is to support the tail section.
 Top view -- the rubber bumpers are actually some I kept from another project -- there are supposed to hold a fuel tank in place, but are sturdy enough to work in this capacity as well. I also reninforced the underside of the R1 seat with 2 layers of cloth to strengthen it up a bit. Will post some pics of the tail when the paintwork is finished.

 Top view -- the rubber bumpers are actually some I kept from another project -- there are supposed to hold a fuel tank in place, but are sturdy enough to work in this capacity as well. I also reninforced the underside of the R1 seat with 2 layers of cloth to strengthen it up a bit. Will post some pics of the tail when the paintwork is finished.
As for everything else, have been waiting for nearly 3 weeks from some zx6r front wheelbearings to come in... hopefully Monday...
Wednesday, July 7, 2010
rearsets and forks
Mailman came by the house twice today!
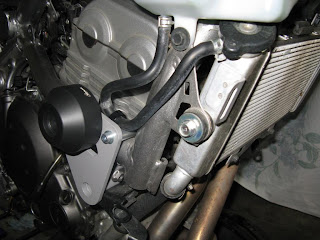
 Valter Moto rearsets. About the same price as Woodcraft, no duty, and reasonable shipping from the UK. Had to readjust the pipe slightly, but it will still work.
 Other side. Had to remove the sprocket cover to get the shifter to orient itself where I want it to. Could reverse the shifting (GP shift), but all my other bikes have the standard street pattern.
 05-06 636 forks. Slid right into the 03-04 triples, as advertised. Brake calipers line up properly, but no bolts yet to install them. Next step is to get the 650 front wheel machined to accept the zx6r front bearings, seals, internal spacer, and axle. It should all line up then...
Tuesday, July 6, 2010

Instead, I found a KTM Duke II upper fairing, crashed, on ebay for a lot cheaper (see sidebar for price information). With a bit of work I've filled in the headlight holes and started to repaint it. Black down the middle, and I'm thinking of doing the trim in Gulf Oil blue (got some stickers to use...)
 This is it hanging in the garage. I think I'll even be able to use the stock gauges, and mount them directly to this fairing, using some aluminum angle brackets. Will have to make some room for numbers, of course, which I am getting from Ratmally in the UK -- they supplied the supermono numbers...
 I've begun the front end swap. Those who are Ninja 650 riders and are considering a new front end, you might want to pay attention, and either do what I do, or ignore me completely. I think I have the proper information on doing this as simply as possible. First, I bought a 03-04 636 front end. This did, as advertised, bolt right in to the frame. Mine already had steering stops removed... will have to come up with another solution for my bike. I understand that the stock steering stops do need to be modified to use in this frame.
 This is the 636 upper. The stem is long enough, because I understand if you go for the 04-05 front triples, things are a tad short. The ignition key tumbler is in place, and works properly. Not sure about the steering lock -- don't plan to use it anyway! Waiting on the forks -- got 05-06 forks, which are allegedly much better than the earlier models. As well, my radial calipers came in. Filthy as all heck, but I spent the day cleaning them up. Horrible, dirty job, but ultimately satisfying in the end.
I also checked the airbox. Filter is original, so needs to be replaced. As well, I also removed the "intake snorkels"... jury is out on this modification, but the following videos show there is some advantage to performing this tweak...
Cool!
Wednesday, June 30, 2010
The new bike
I picked up this machine through Crashedtoys.com in the USA. They have several sites where bikes are kept, and this 2008 Ninja 650 just happened to be at the one closest to my folks in Fort Frances, Ont. I put in a bid and won it. I'll be keeping track of the total costs, but I did get it for a good deal. Kate and I headed out there the first weekend I was available to pick it up. Fired right up, and I was able to snag some go-faster parts as well. I also plan to use Doug and Billy as guides as they have been racing these bikes for years and are bloody fast!

 Low miles!!!
 This is the bike raced by Ryan Farquar in Ireland. Pretty pukka machine, with some cool parts, but stock forks (at least on the outside). Short of free suspension development work, the hot set up for these bikes is 636 USD forks, Penske or Elka shocks, and decent tires. 250 gp tires will work, and the Martens boys use michelin slicks.
  Once home, I decided to see if I could do something about the exhaust. The muffler also contains a catalytic converter and weighs in the area of 14 lbs. Concentrated under the bike, the fact remains that that is a lot of weight, even if it is near the C of G. My first supermono exhaust utilized a $25 zx10r Two Brothers pipe I got off of ebay. I decided to cut it down (almost in half!) and repack it. Amazingly, the connector link pipe slid on the stock ex headers perfectly.
 I then had to figure out how to best orient the pipe and longer header tube onto the machine. Note that the bike has been stripped, short of the tank. Waiting for some parts to come inbound... more on that later...
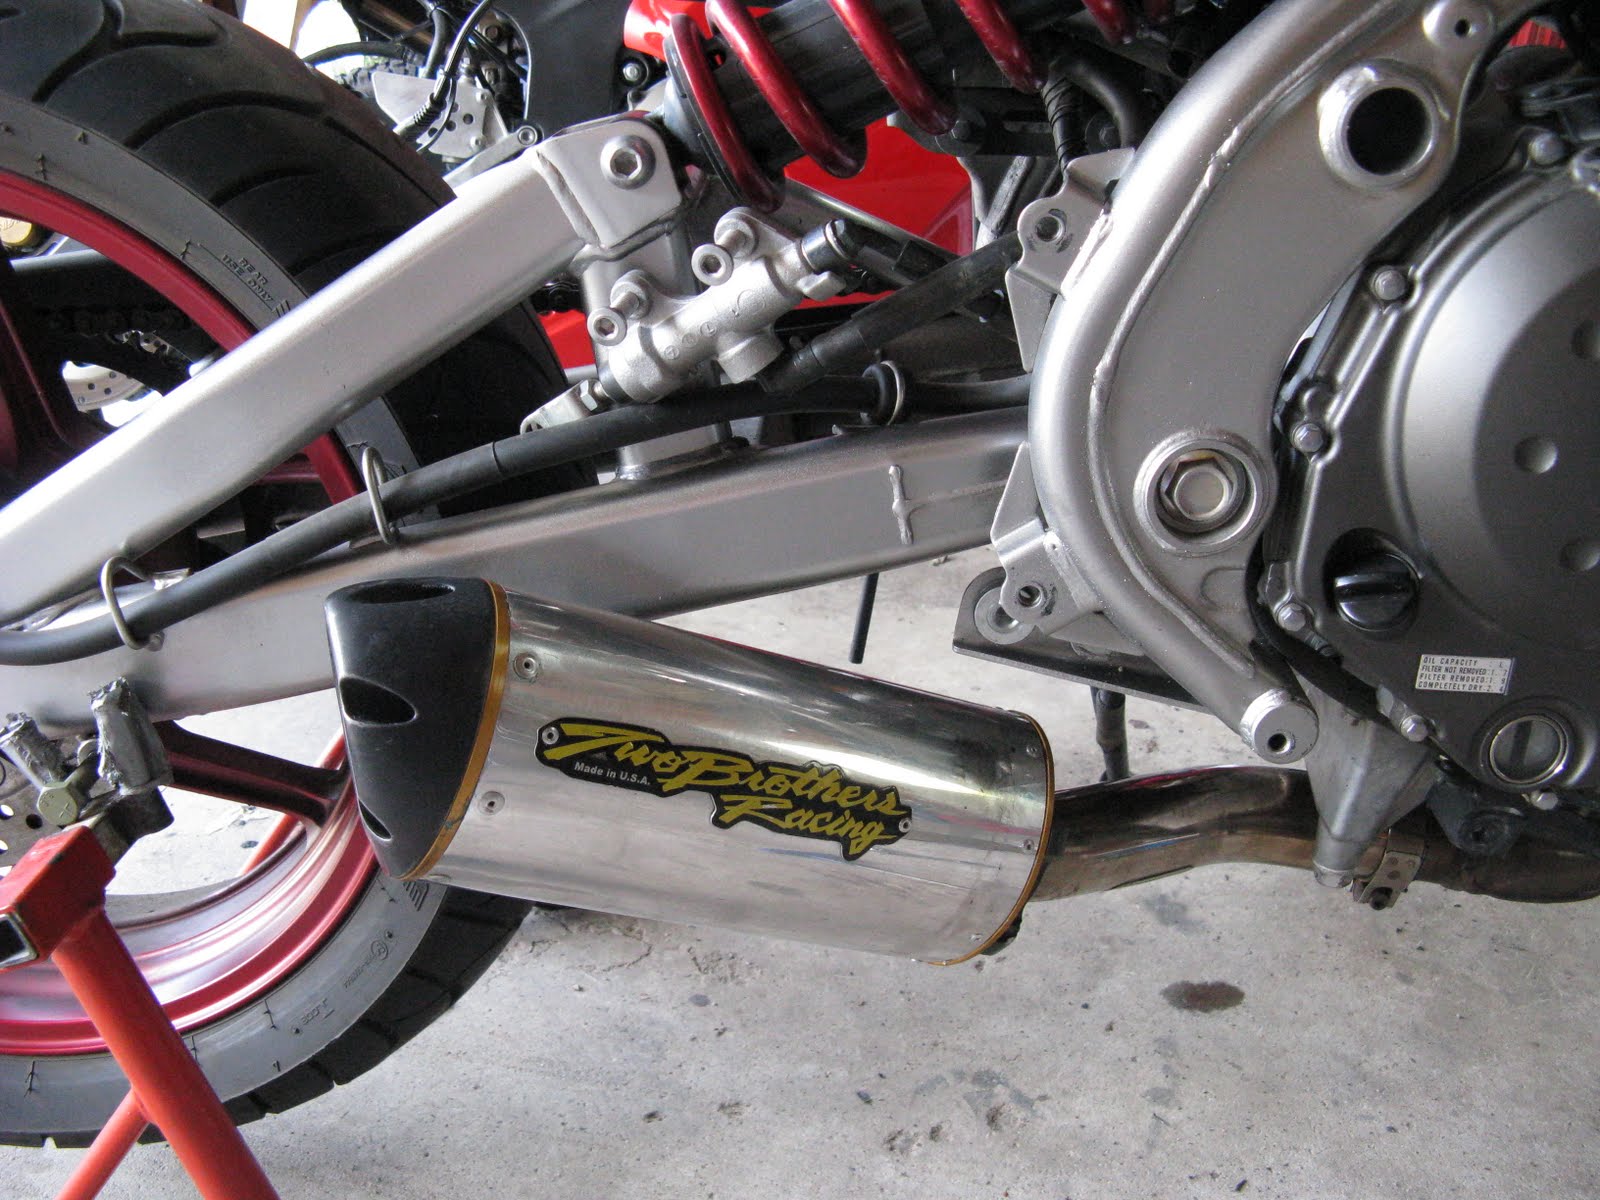 This is where I'll start... I think it will work well, and I just need to get the rearsets in to coordinate the final location. Had to fire it up as is, and it sounds awesome!
 The muffler appears to be hanging a bit low, but it is actually no lower than where the stock exhaust was. I think I saved about 10 lbs, and it didn't cost me a think. The repacking materials I had were leftover from other projects, and the pop rivets I used were already sitting in the garage. 3 hours and a new slip on!! I have no idea what kind of power it will make, but you would assume its an improvement...
Subscribe to:
Posts (Atom)